Help Documentation
Thank you for purchasing my plugin. If you have any questions that are beyond the scope of this help file, please feel free to email via my user page contact form here. Thanks so much!
Installation
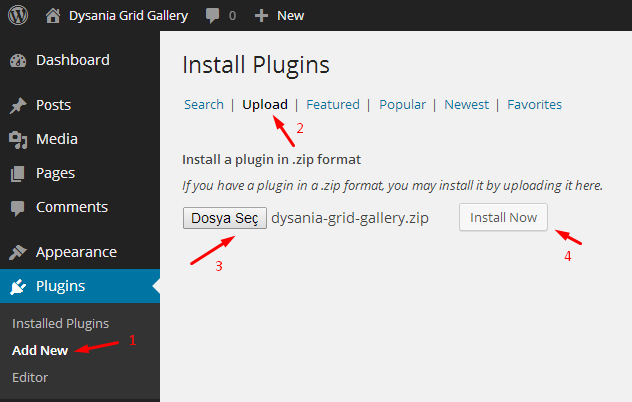
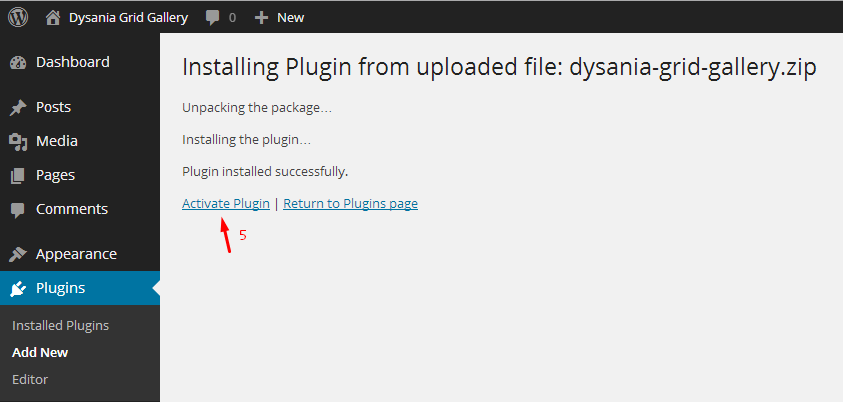
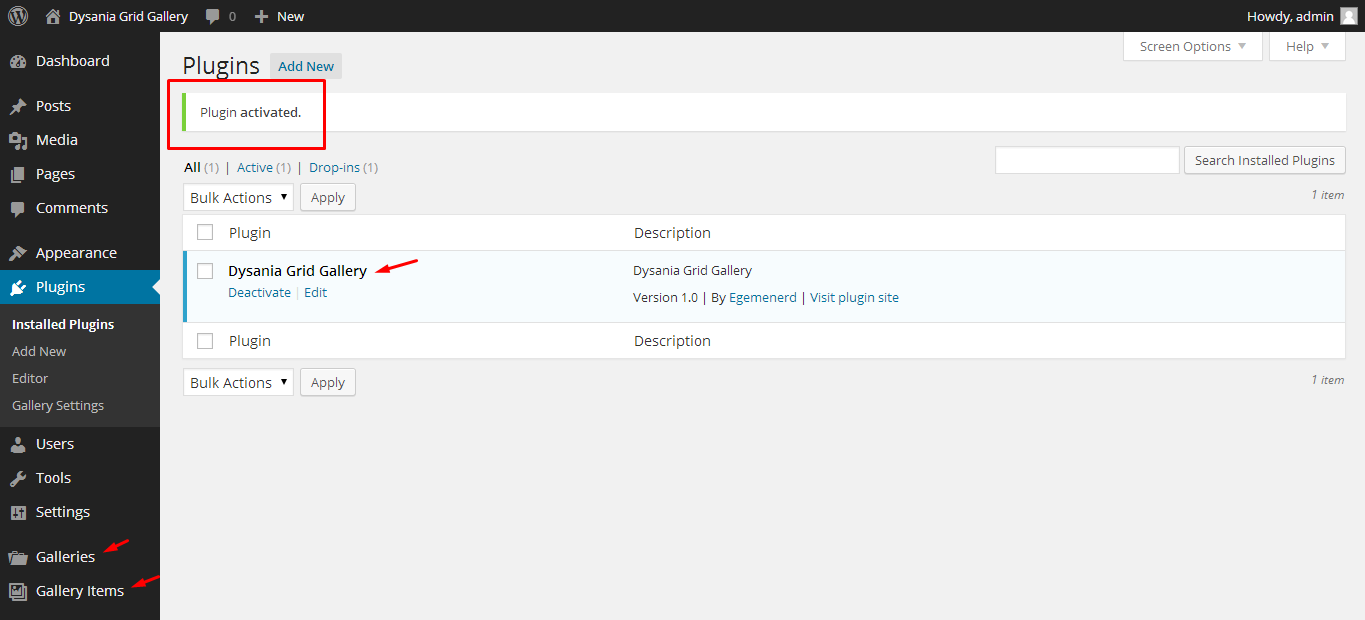
If installation is successful, you should see the following screen;
How to use?
Create a gallery
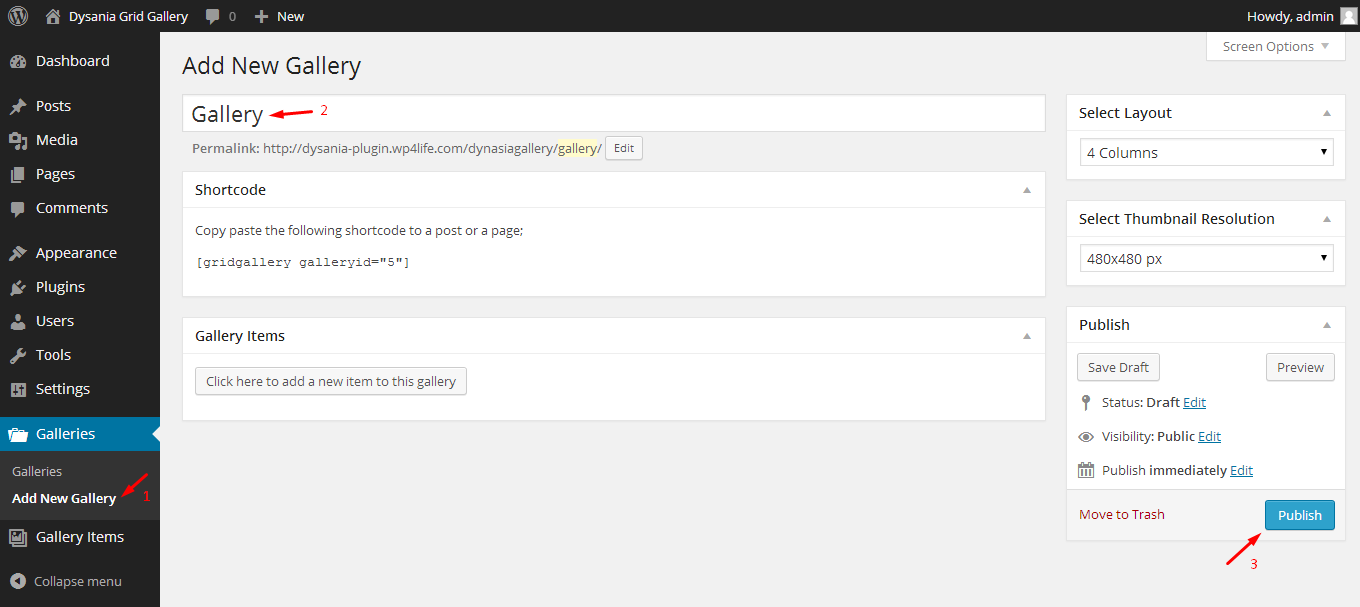
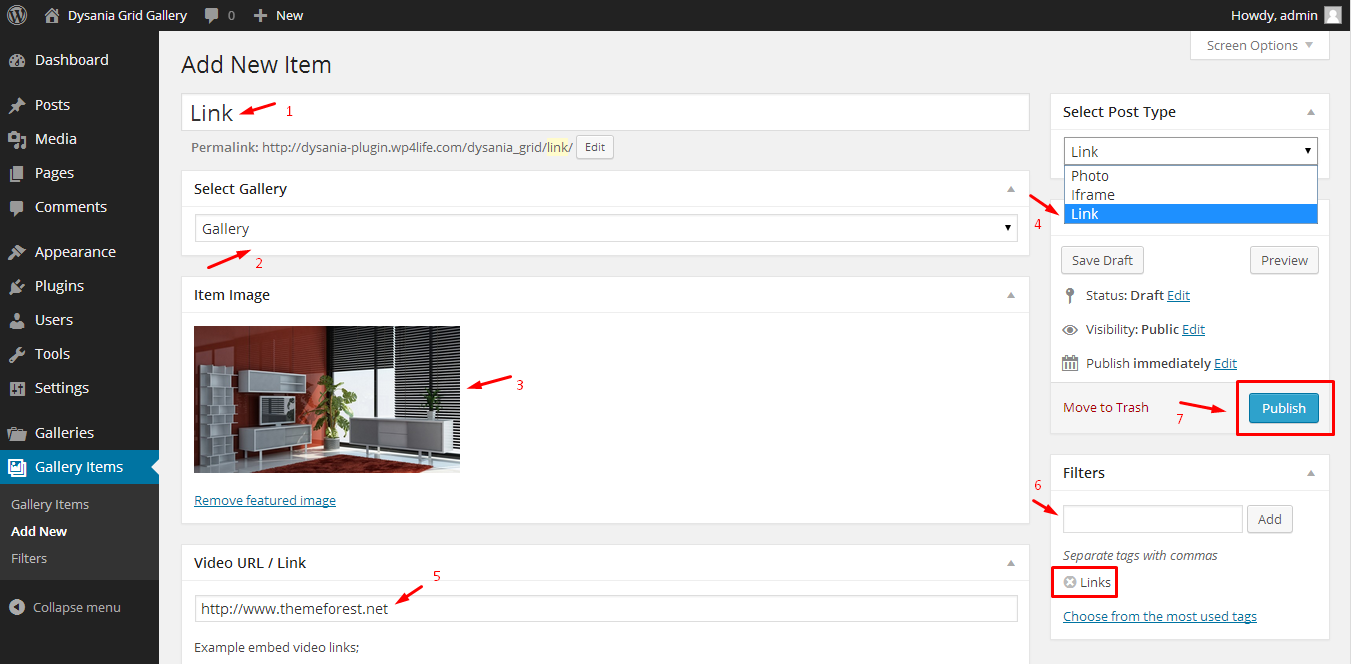
First of all you should creat a gallery. Click "Add new gallery" link, add a gallery name and click publish button.
Important: To use gallery shortcode, first of all you should publish the gallery.
Add Gallery Items
After creating a gallery, click add new gallery item link and start to add your gallery items;
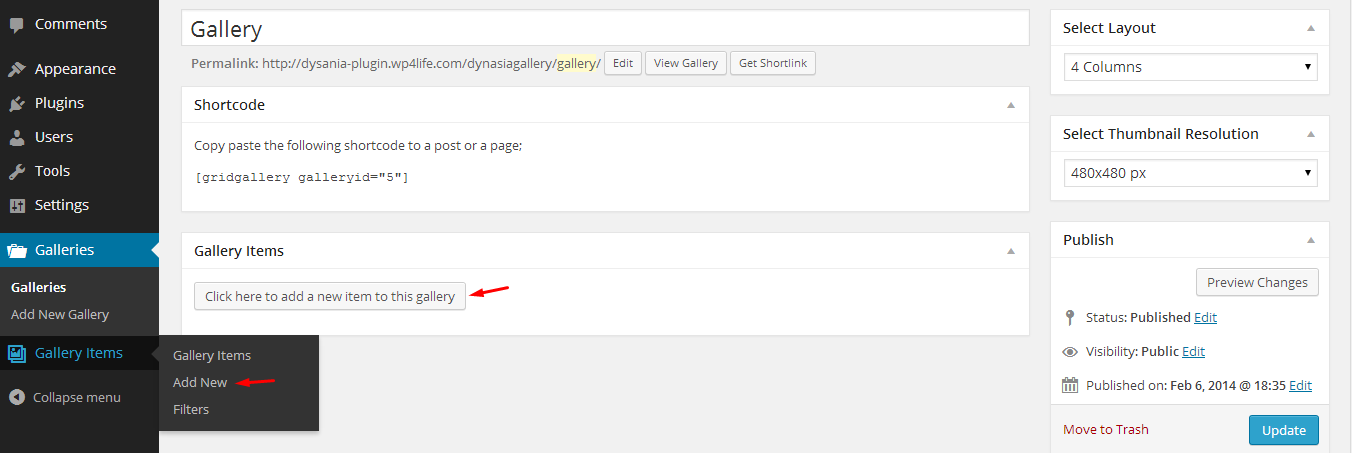
How to add a Photo
1) Add a title to your gallery item
2) Select gallery from dropdown
3) Upload an item image
4) Add filters (optional)
5) Publish it
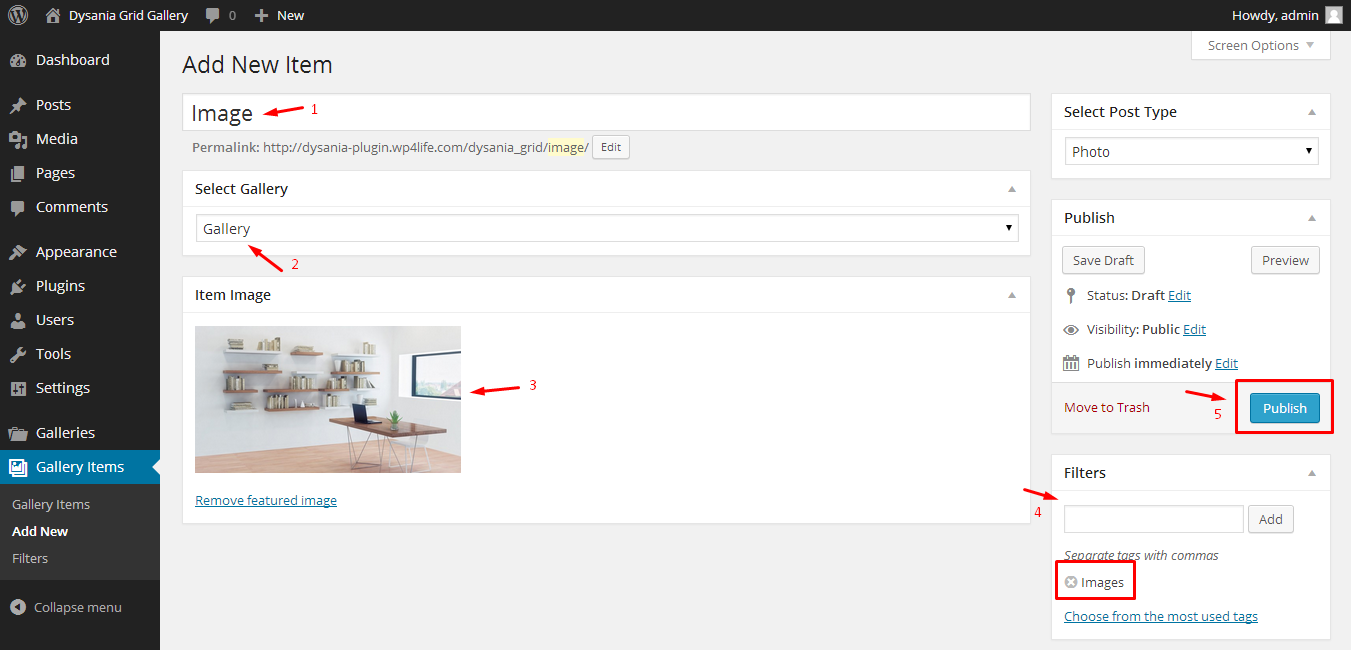
How to add an iframe (video)
1) Add a title to your gallery item
2) Select gallery from dropdown
3) Upload an item image
4) Select iframe
5) Add your video embed link. (You can also add any website link instead of a video embed link. That website will be displayed as a lightbox when user clicks on that item.)
6) Add filters (optional)
7) Publish it
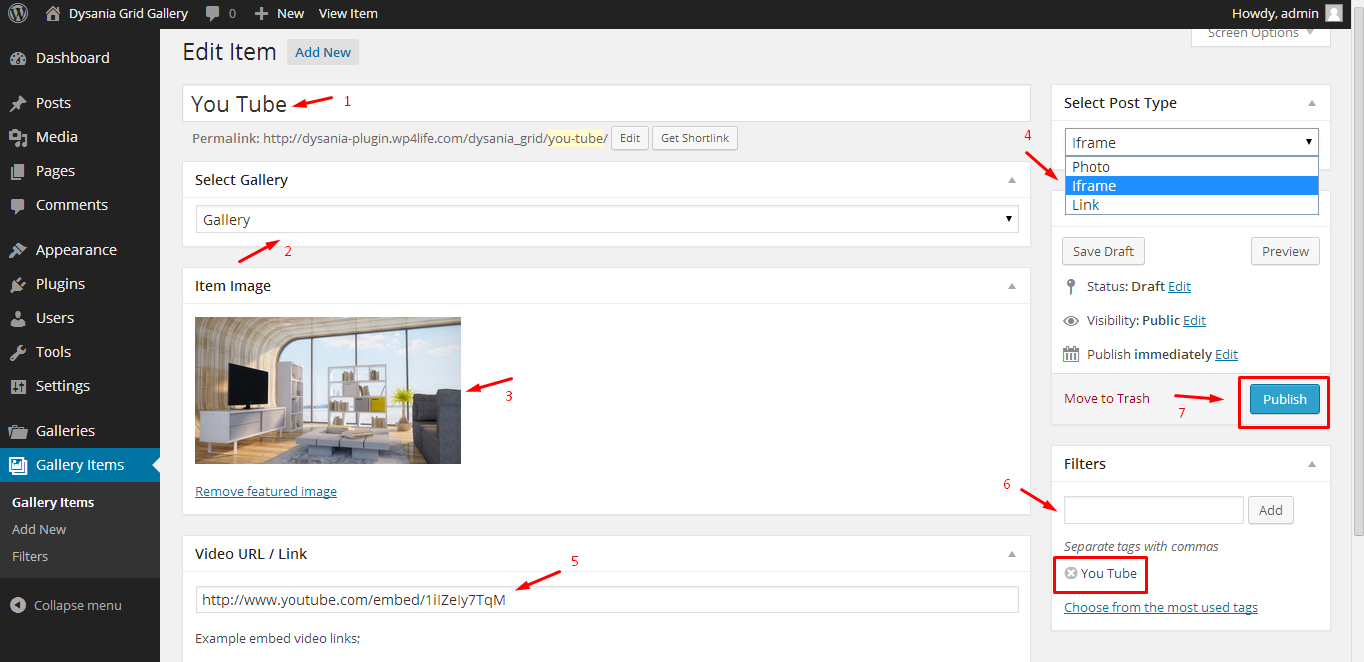
How to add a direct link
1) Add a title to your gallery item
2) Select gallery from dropdown
3) Upload an item image
4) Select link
5) Add an external or an internal link
6) Add filters (optional)
7) Publish it
New Feature! (1.4)
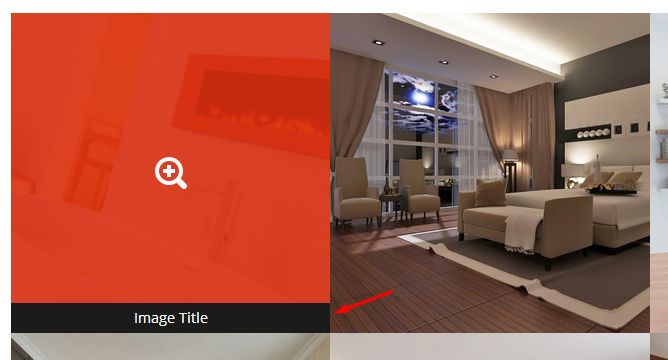
Now you can add titles to the thumbnails. If you don't want to add a title to the thumbnail, leave this field blank...
If you are using a gallery in a small area (widgets), titles may not appear...

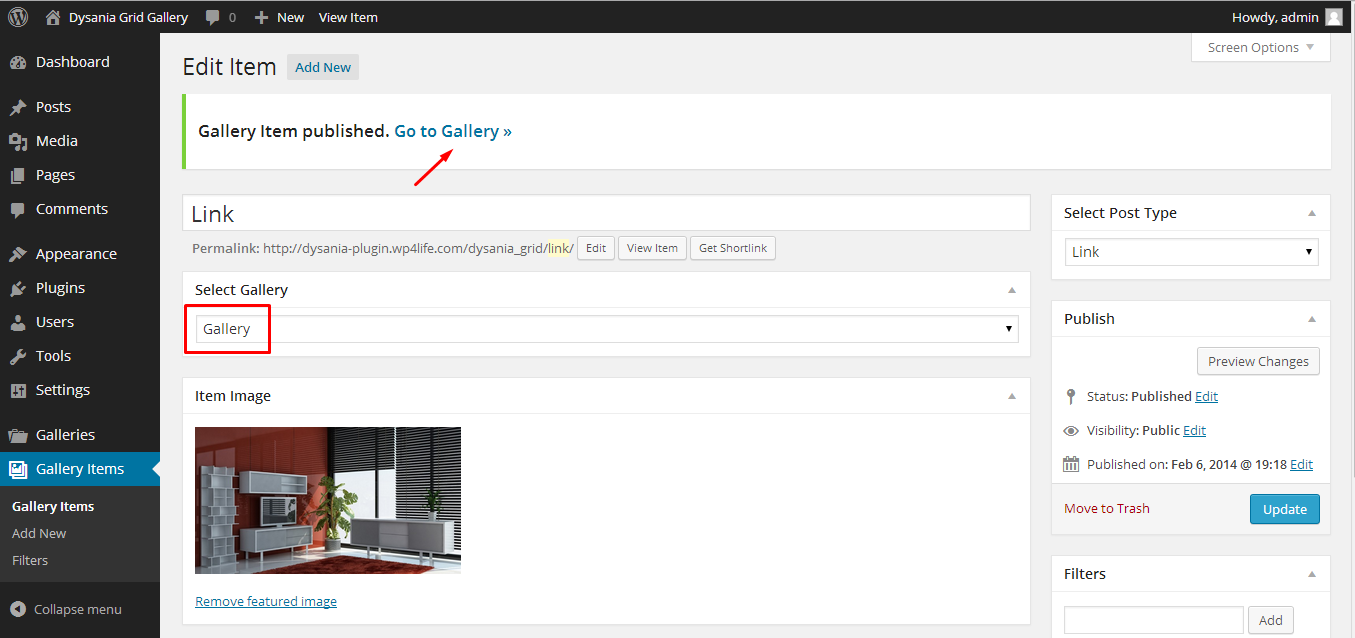
Go to Gallery Page
After adding your gallery items, you can go to the related gallery page with clicking "Go to gallery" link or you can click on "Galleries" menu to see all available galleries.
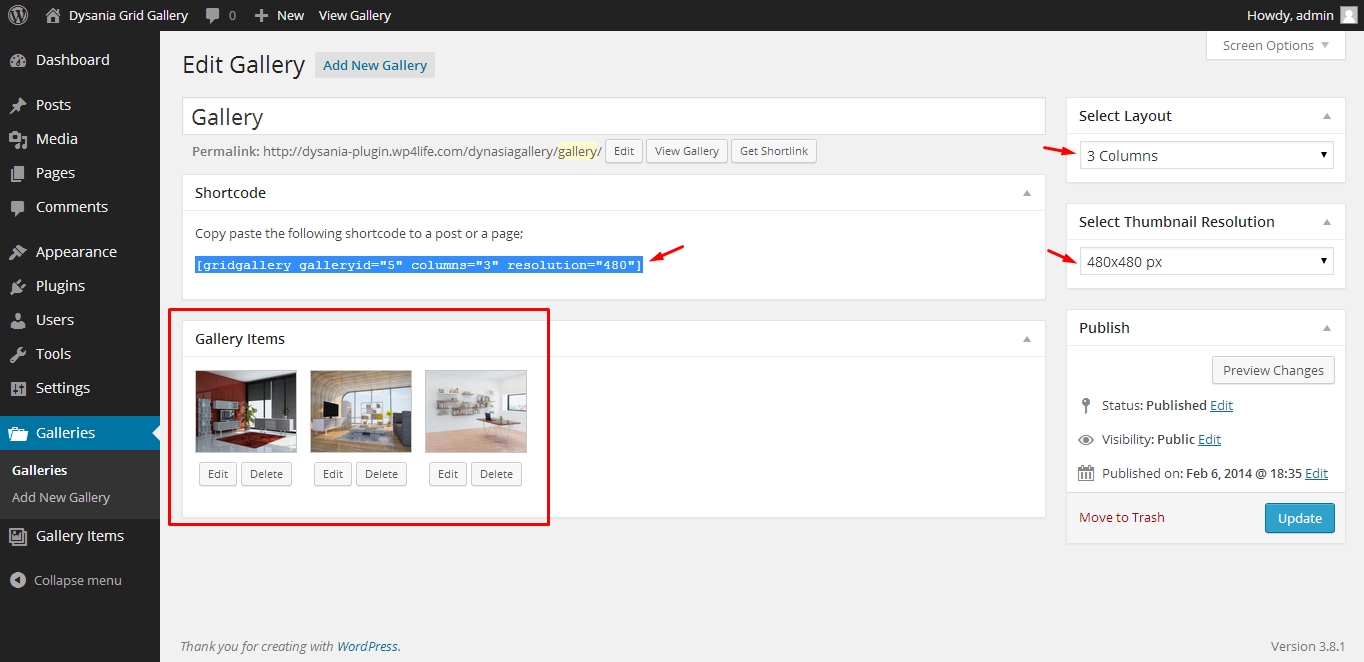
Use the Shortcode
Now you can add this gallery to any page or post with the gallery shortcode which is on the gallery's page. You can change column number of the grid and resolutions of the thumbnails. Default column number is 4 and default thumbnail resolution is 300x300 px.
Hint: You can select thumbnail resolution according to column number. For bigger column numbers, use smaller images for better performance.
For example if you select 2 columns, you should select 600x600 px resolution for better display. If you select 5 columns, you should select smaller image resolution for better page loading performance.
You can also view, edit or delete gallery items directly from edit gallery page.
Filter Menu
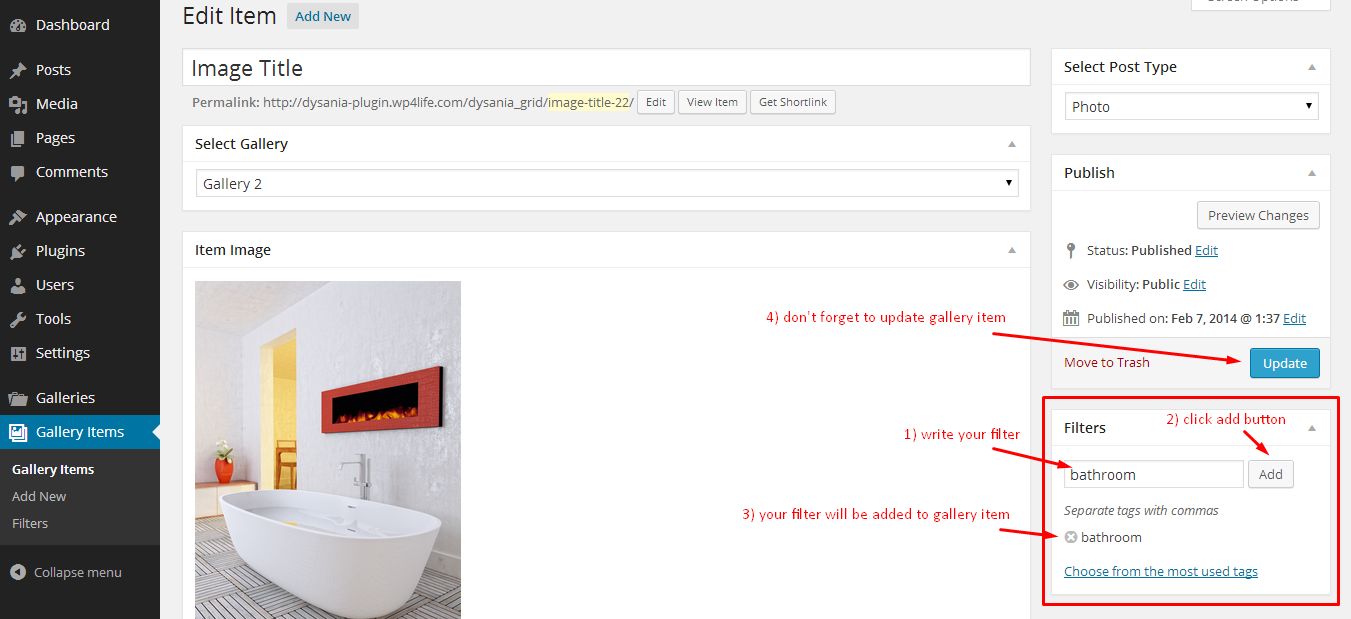
You can create filterable galleries with filter menu feature. To use this feature, you should add filters during adding or editing an item.
Adding a filter menu
If you want to add a filter menu to your gallery, you can use "Filters" shortcode. There is a "add a filter menu" icon on your text editor. Click on it. Sample filter menu code will be added your page.
If you want to add shortcodes manually, I recommend you to use "Text mode" of the text editor.
You should add your filters like the following structure;
[filters galleryid="1"]
[filter]Living Room[/filter]
[filter]Bedroom[/filter]
[filter]Bathroom[/filter]
[filter]Office[/filter]
[/filters]


Using multiple filters
To add multiple filters to a page, change the "galleryid" value of the "filters" with the related grid gallery id.
[filters galleryid="1"]
[filter]Living Room[/filter]
[filter]Bedroom[/filter]
[filter]Bathroom[/filter]
[filter]Office[/filter]
[/filters]
[gridgallery id="1"]
[filters galleryid="2"]
[filter]Images[/filter]
[filter]Videos[/filter]
[filter]Links[/filter]
[/filters]
[gridgallery id="2"]
Displaying all filters
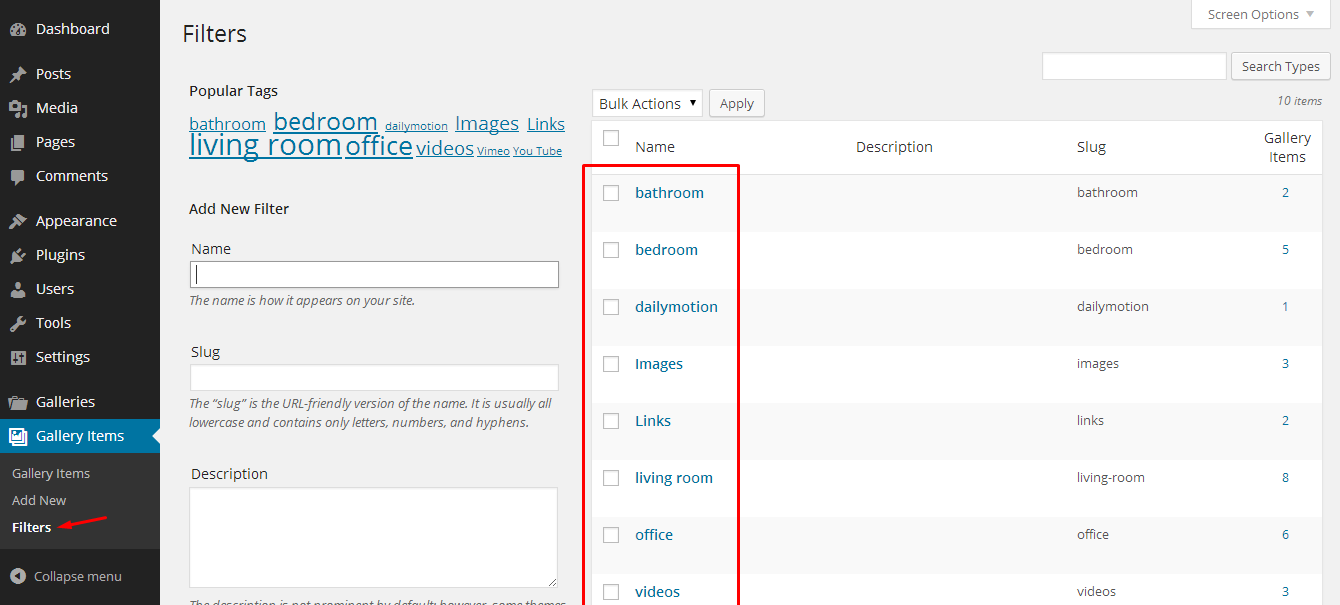
Add only 1 filter into each [filter] shortcode and be careful when adding words. They must be the same as your filters. You can view,edit or delete filters at Filters page.
How to use widget
Using Dysania grid gallery widget is very easy. Just drag-drop the widget to your sidebar, make your column and resolution choices and click save button. It is totally responsive and fits all widget fields.

Gallery Settings
General
Default Image: If you publish a gallery item without an image, this image will be displayed on your gallery.
Disabled Image Opacity: When a user click on any filter, some items are disabled. You can change opacity values of these images.

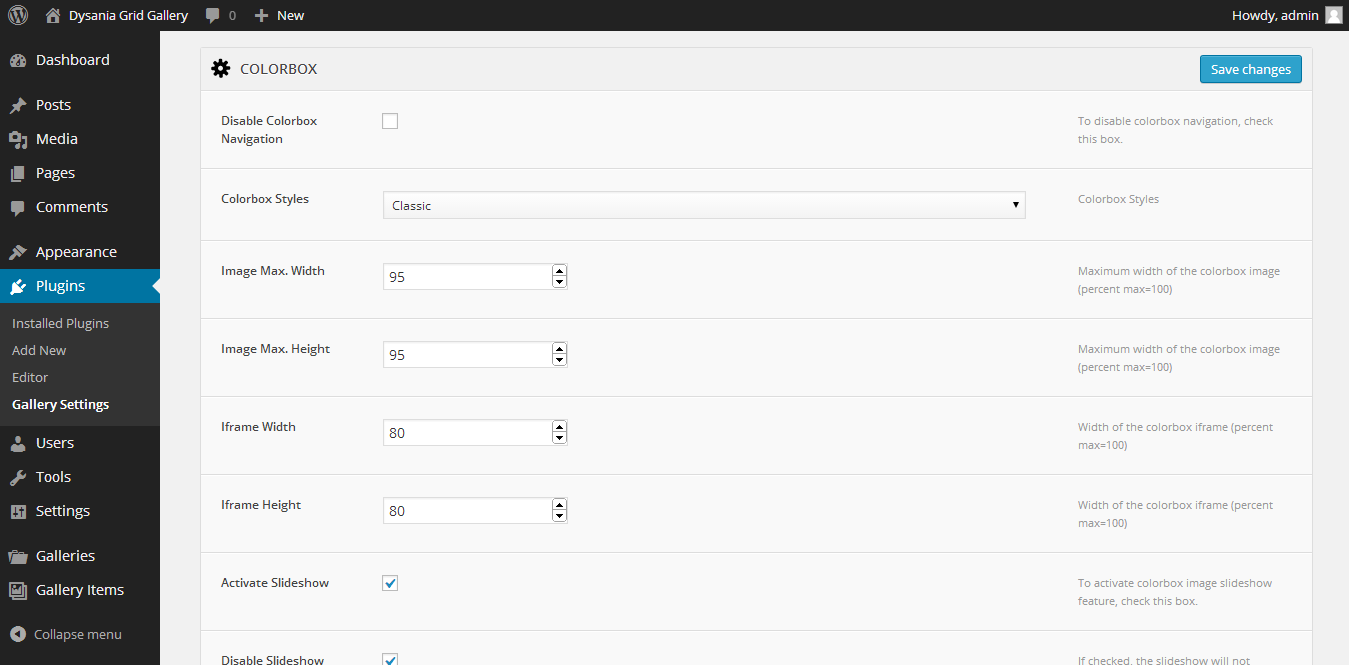
Colorbox
Colorbox Styles: There are 6 different colorbox style in the plugin. You can select any of them.
Colorbox Styles: There are 6 different colorbox style in the plugin. You can select any of them.
Image Max. Width: Maximum width of the colorbox image (percent max=100)
Image Max. Height: Maximum width of the colorbox image (percent max=100)
Iframe Width: Width of the colorbox iframe (percent max=100)
Iframe Height: Width of the colorbox iframe (percent max=100)
Activate Slideshow: To activate colorbox image slideshow feature, check this box.
Disable Slideshow Autostart: If checked, the slideshow will not automatically start to play.
Slideshow Speed: Speed of the slideshow (second)
Fonts and Alignments
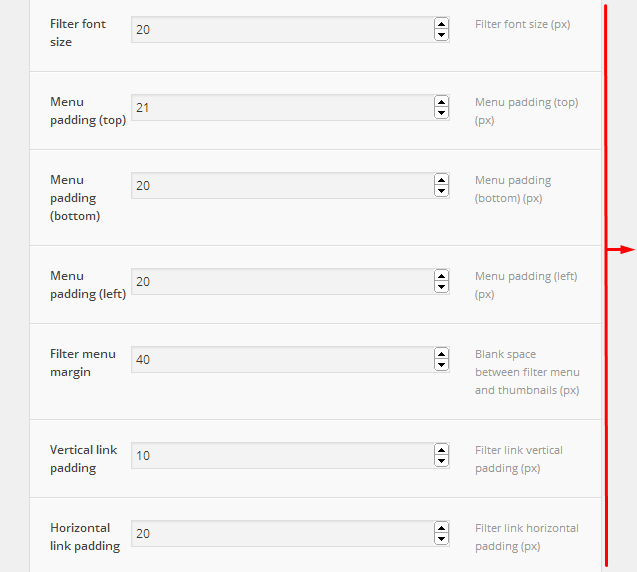
You can change font size, margins and paddings of the filter menu here. In this way, it looks good on all themes.

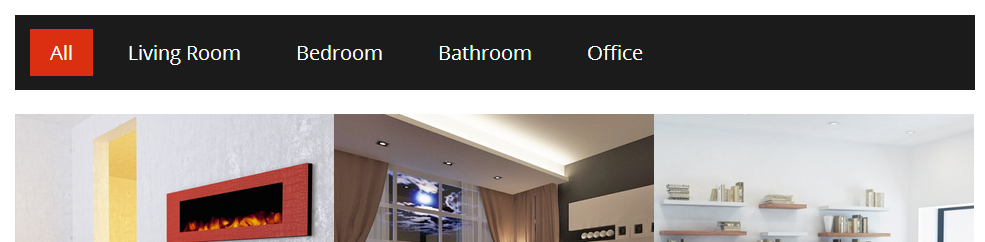
Result

Result
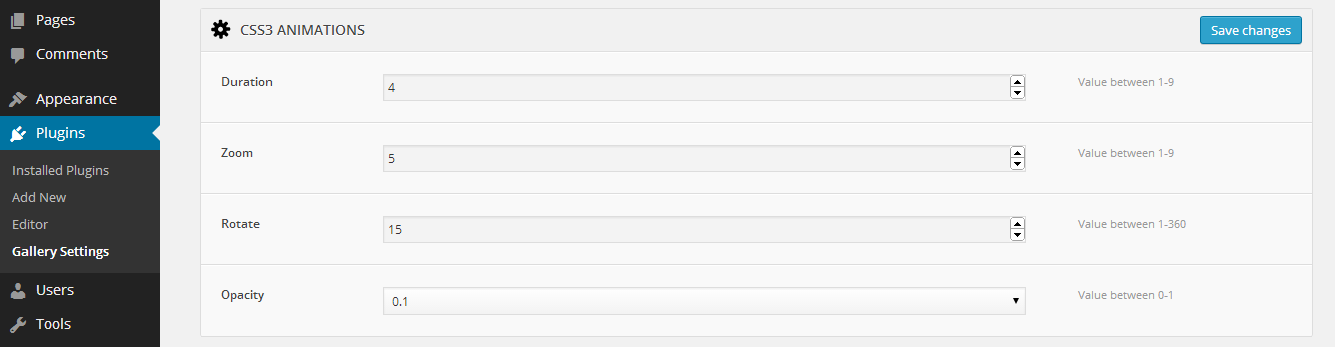
CSS3 Animations
You can change image hover effect and create your own animations. Just play with them and see the results :)
Icons
You can upload your own mouse over icons. There isn't any size limitation.


Colors
I used 4 different color on filter menu and gallery and you can change each color here.

Credits Files
I've used the following scripts and other files as listed.
JavaScript
Documentation File Template
Demo Images
Once again, thank you so much for purchasing this plugin. As I said at the beginning, I'd be glad to help you if you have any questions relating to this plugin. No guarantees, but I'll do my best to assist. If you have a more general question relating to the plugins on Codecanyon, you might consider visiting the forums and asking your question in the "Item Discussion" section.